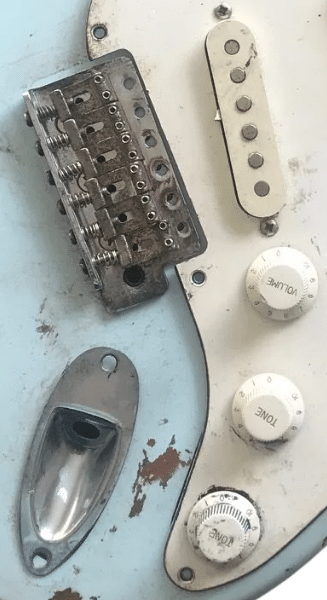
There are a wide variety of ways to relic guitar hardware to make it appear “road-worn.” Each method uses various techniques and chemicals to distress and then oxidize the metal plating. In this article, I’ll reveal a straightforward approach that gives excellent results.
Although “pre-reliced” guitar hardware is easy to find these days, doing it yourself can save quite a bit of cash and make it look the way you like best.
Keep on reading to learn everything you need to know!
You can use the table of contents below to take you to the area that interests you. Click on the little box to open it and then click on the section of the article you want to read, or you can read from start to finish if you want the full hardware relicing experience!
Click here if you are in a hurry to go directly to the relicing procedure.
What Is Guitar Hardware Relicing?
As guitar players use their instrument over the years, sweat and oils from their hands and pollutants like cigarette smoke from clubs can make a guitar’s finish and hardware look old.
To circumvent the time it takes this natural process to occur, guitar builders invented ways of distressing the metal plating of an instrument’s hardware, including tuning machines, bridges, knobs, input jacks, and screws.
Each method uses the direct application or vapor exposure to acids like ferric chloride, muriatic acid, or even vinegar (acetic acid) followed by an oxidant to enhance the aging process.
The plated finish of any guitar hardware (nickel, and silver, gold, or black chrome) can be reliced.
There are various degrees of hardware relicing, from light to “super-heavy.” You can see examples of some of the finest relicing jobs in Fender and Gibson Custom Shop Guitars.
Here’s How To Relic Guitar Hardware
Before attempting this, click here to read the warning about relicing guitar hardware, especially if you are inexperienced with working with toxic and potentially dangerous chemicals.
Hardware Relicing Procedure
Here is a straightforward 5-step method to relic your hardware that I highly recommend from Schecter Guitar Research. Be sure to watch the video below for additional details and read my safety procedure checklist.
1. Break Through The Hardware Plating

Most guitar hardware is plated to protect its finish. It may be plated with chrome, black or gold chrome, nickel, black or gold nickel, etc. To begin the relicing process, you need to roughen the hardware plating with a medium to heavy-duty Scotch-Brite pad. Use protective eyewear.
If you are more experienced, you can use a Dremel tool with an abrasive buffing attachment to speed up the process. As you proceed, you will see the plating shine begin to dull, which is a good stopping point. Be careful not to damage small parts such as screws (heads and threads).
2. The Acid Treatment

Various acids, including ferric chloride, muriatic acid, and vinegar, can be used. Ferric chloride (iron mixed with hydrochloric acid), commonly used as a copper etchant, is used in the video below.
Whenever working with acid, use acid-resistant gloves on both hands that cover as much of your forearms as possible, protective eyewear, a shop apron, and a P100-rated respirator in a well-ventilated area.
Apply the acid to the metal hardware using a long acid-resistant applicator, like a gunsmithing q-tip. Be sure to remove the acid after about 15 to 20 minutes to keep it from eating through the metal. Letting it stand for less time will give you a less reliced look.
Try to avoid applying the acid to moving parts, like screw threads, whenever possible.
3. Removing The Acid
When the acid’s application time has elapsed, rinse the metal hardware thoroughly with water and carefully dry it with an air gun or paper towels.
4. Applying An Oxidation Accelerant
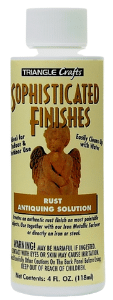
After drying thoroughly, apply an oxidation accelerant, such as “Triangle Crafts Rust Antiquing Solution” (used in the video below). This helps to complete the metal’s relicing process. Use the same safety precautions as you did for the acid application.
Use a pipette or gunsmithing q-tip to apply the solution sparingly to various areas of the hardware where you want to give it a more aged and rusty appearance, such as areas that are subjected to the sweat from a player’s hands.
The oxidant will only react on areas of the metal that the acid has eroded. Like the acid application, you need to judge how much you want to use, depending on the degree of relicing color you desire. This chemical gives the metal a rusty or green (verdigris) appearance.
Thoroughly wash off the oxidant with water when satisfied with the look to prevent the oxidation process from continuing. Go for a treatment time of 15 to 30-minutes, or wait more or less time according to taste.
5. Lubricate Any Moving Parts
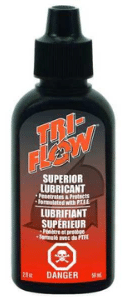
After your oxidized metal parts are completely dry, lubricate any moving parts, such as screws in bridge saddles. In the video below, Tri-Flow Lubricant is used, which is a general-purpose PTFE-based solution.
Machinists commonly use Try-Flow because it is Teflon-based and long-lasting.
It has a light viscosity, so it moves into small moving parts to lubricate and protect them against rusting.
Watch This Video
Here’s an excellent video from Schecter Guitar Research that shows all the steps I outlined above in more detail. This will take you through the entire process and is my favorite method.

Safety Procedure Checklist
Here are the safety items and precautions you need to take before you begin to relic guitar hardware.
Safety Equipment
- Safety goggles
- P100-rated respirator mask
- Acid-resistant gloves
- Protective shop apron
Safety Procedures
- Apply acid in a well-ventilated area or outdoors
- Keep acid and other chemicals away from children and pets
- Dispose of all chemicals safely, as hazardous waste
- Seek medical attention immediately if chemicals come in contact with your body

Advantages Of Relicing Hardware
- Can enhance the resale value of the instrument
- Makes the guitar look well-played
- It’s a look that guitar players appreciate
- Can make a scratched-up finish look more “natural”
- Reliced hardware requires less maintenance to look good
- Gives your audience the impression that you have been playing for many years

Disadvantages Of Relicing
- Requires experience to do an excellent job
- Can damage hardware, especially moving parts
- The relicing process is irreversible
- Can be dangerous, especially for inexperienced people

Beware Of Relicing Expensive Guitars
High-end guitars can lose a significant portion of their retail value if they are reliced after they are purchased, especially if you are not an authorized dealer or inexperienced with the relicing process.
To retain the guitar’s value, the degree of hardware relicing should match the degree of wear or relicing of the guitar’s body and neck finish. This can be very difficult to get right if you are not a pro.
Are You Qualified To Make Guitar Adjustments Or Modifications?
Note: Relicing guitar hardware is a potentially dangerous procedure. It could result in bodily harm, such as skin or lung damage. You could also damage the metal parts you are relicing or other parts of your guitar in the process. Do not attempt to do this if you don’t have the proper equipment or are not sure you can do it safely, especially if you are inexperienced in relicing.
It’s great to work on your guitars, especially if you have a lot of them, but you should always be aware of your limitations.
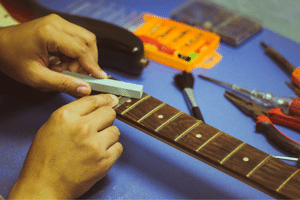
Adjusting things like an electric guitar’s string height (action) or pickup height can be straightforward. Still, some adjustments require the proper training and experience, like adjusting a guitar’s truss rod.
When you doubt your ability to adjust, repair, or modify your guitar, it’s always best to bring it to a competent guitar technician or luthier (guitar designer & builder). You can permanently damage your guitar, and it might never play and sound right again!
Making modifications to your guitar can void its manufacturer’s warranty and cause permanent damage to the instrument. Certain modifications are irreversible, so you may be stuck with them, even if you desperately want to restore the guitar to its original condition!
I learned that the hard way over the years until I did a three-year apprenticeship in a guitar repair shop. Now I have my own home workshop with the proper training and equipment to safely maintain and repair all my instruments.
Remember: “When In Doubt, Send It Out!”

Frequently Asked Questions
Here are some of the questions I get asked about relicing guitars.
If your question does not appear here, please put it in the comments, and I will get right back to you with an answer.
Why Do People Love Relic Guitars?
Reliced guitars can add “character” to the instrument. Relicing done right can make a guitar look well-played and “road-worn” over the years. This can also give an audience the impression that you are an experienced player that has had the guitar for many years.
Guitar players like reliced guitars because it can make them look like costly true vintage instruments. Besides, they just look cool!
Do Reliced Guitars Sound Better?
If the wood or pickups on a reliced guitar are properly aged, it can make the instrument sound better. Some reliced guitars can actually play better. For example, if the neck edges are rolled to make the neck look old and worn-in, it can also be more comfortable to play.
How Much Does It Cost To Relic A Guitar?
This depends on if you are doing it yourself or having the guitar professionally reliced, how much of the guitar will be reliced and to what degree, and if you are relicing parts that are already on the guitar or if you are buying new ones.
Complete relicing jobs, including the neck, body, and hardware, can be costly. A professional-done, fully reliced job can be as much as $1,000 to $2,000 or more!
Why Are Relic Guitars So Expensive?
If you buy a new reliced guitar, a lot of the expense involves all the attention to detail that is hand-done, typically in a custom shop by an experienced or master builder. Things like finger mark impressions on a lacquered or urethane maple fretboard and paint-wear or checking on a guitar body are very time-consuming to produce a convincingly realistic relic.
If you’re looking for an excellent guitar with a mild relic, check out Are Vintera Fenders Good?- Fender Road Worn 60s Strat Review.
How Do You Naturally Relic A Guitar?
The best way to naturally relic a guitar is by playing it as much as you can over the years. An authentic vintage relic will eventually look the best and be worth the most money because it’s “honest wear.”
Things like sun and club smoke exposure can help to accelerate the development of finish checking and vintage patina that causes yellowing or darkening over time. Leaving a guitar out of its protective case will add dings and scratches in all the right places.
Can You Relic Guitar Hardware Without Acid?
Although many methods have been tried, like soaking the hardware in salt water, acid is the best way to get realistic, reliced hardware. Some players use vinegar, an organic acid (acetic acid) that does not work as well as inorganic acids such as ferric chloride or muriatic acid.
It takes many years to naturally relic guitar hardware.
How Do You Relic A Guitar Screw?
Very carefully or not at all! Moving guitar parts like screws can be challenging to relic without compromising their functionality. The heads of screws can be carefully reliced with attention to not destroying the screw slot. It’s best to avoid relicing the screw thread unless you really know what you are doing.

Final Thoughts
I hope this article on how to relic guitar hardware has been helpful! Pre-reliced guitars, such as Fender Custom Shop models, can be cost-prohibitive for many players. Doing it yourself can be an attractive option, but one of the most challenging steps in the process is relicing the hardware.
Relicing guitar hardware involves using a process that makes it look old or “road-worn.” There are many approaches to relicing hardware, some of which are deemed company “trade secrets.”
The relicing process outlined in this article is one that I recommend because it is straightforward and can give good results, depending on your experience and skill level.
Before you begin, having all the proper safety equipment, tools, and solutions is essential. You should also know the basic “do’s and don’ts.” This will help you avoid harm to yourself or your guitar.
Be careful not to damage the integrity or functionality of the hardware you relic. Avoid relicing things like screw threads unless you really know what you are doing.

Beware of relicing the hardware on expensive or vintage guitars, which could lower their re-sale value and change the way they sound and play!
I think you’ll really enjoy my article on Cool Guitar Finishes – Is The Wow-Factor Your Main Criteria?

Tell Me What You Think
Please leave a comment below if you enjoyed this article, have any questions about how to relic guitar hardware, or want to give your point of view. I will be happy to help you.
- Have you ever reliced guitar hardware? How did it turn out?
- What relicing process do you favor? Why?
- Would you be more likely to buy a reliced guitar or make your own?
- After reading this article, are you planning to relic your guitar hardware?
- What else is on your mind?


hello, I loved your article, I’m a guitarist and I really like music, it’s not my job at all, and I don’t earn much, that’s why I was looking for ways to recycle and maintain my guitar, you gave me hope, on the other hand are these products toxic? Thank you very much for your advice .
Hi, Omama
Thank You for your comments and question.
If you have an electric guitar that you want to make appear older or “road-worn,” this article will show you how to distress the metal plating on hardware like the tuning machines, bridge, and input jack.
It is potentially dangerous to work with strong acids, so you must follow all the recommended safety procedures and have the right equipment. So, yes, the chemicals can be toxic.
The video shows you how to do it, step by step.
Please let me know if you have any additional questions.
Best Of Luck,
Frank
Wow! A site where i can get extensive information on how to relic my guitar in order to make it appear to be “road worm.” There are a wide variety of ways to relic guitar hardware to make it appear “road-worn.” People seems to be more interested in players if they feel they have been playing professionally a lot. So why not? You have provided a step by step instruction on this process, provided a video to watch to see it being done and have listed many safety procedures because you are using strong acids. This is an exceptional site to enable me to do this myself. Thank you for all the valuable tips.
Hi, Toplink
I appreciate your comments and am thrilled you enjoyed the article!
There are a lot of players out there that would like to relic their guitar hardware but are a little reluctant, and hopefully, this method will set them on the right path.
Reliced guitars can look very cool, but they are expensive to buy. They are typically custom shop models.
Frank
Loving your site. I had a coworker that was enamored by the local country/cowboy front man at one of the local clubs. He had the typical costume, hat,flowing hair and beard. She was showing me a picture she had taken and made the excited comment, “just look at that guitar!” It was the first extreme relic tele I had ever seen and it looked like it was played hard for 40 years. I personally am not big on relics but apparently girls love them when it fits the persona. Lol
Hi, Ronald
Thanks, once again, for your comments!
I’m thrilled that you are enjoying my site!
Some of the relic guitars look pretty cool and play great. I have one of the first relics to come out of the Fender Custom Shop, but now, because of the time that has passed, it is becoming a “vintage relic.” Hahaha!
Relic guitars are sort of like the jeans with the holes in them that people buy new because they look old and pay a lot more money for. They can give people the impression that you are a great player because you “wore out” your guitar. ?
I buy most of my guitars new or build them myself. Eventually, they become honestly “reliced.”
Keep on Rockin ?
Frank ?